Here comes some serious solar heat
I lived with solar heat from the Rev 2.0 system for two heating seasons, 2001 and 2002, and was not getting very warm on cold winter days. I experimented with varying the airflow and when the blower turns on and off. What I found is that the system was working as well as could be expected. The maximum amount of heat it could supply was being harvested and delivered into the house. What is needed here is a larger heat collector.
Rev 2.0 Solar Heat Collector

[ photo of Rev 2.0 used for 2001 and 2002 heating seasons ]
Rev 3.0 Solar Heat Collector

[ photo of Rev 3.0 for 2003 and beyond ]
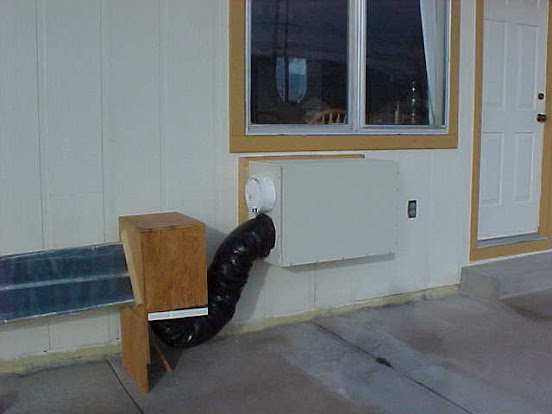
This is the larger heat collector. You can see that I adopted the design of Rev 2.0 system by simply extending the down spouts from 10 feet to 20 feet in length. Effectively doubling the size of the solar collector should increase the total amount of heat delivered into the house. I hope I'll be warmer on cold winter days. We'll see... The swamp cooler is also attached to the house at the same time, so no more rebuilding things when seasons change. There is a removable insulation partition inside the swamp cooler to close it off completely during the winter heating season.
A less obvious thing you can't see in the photos above is where the cold house air enters the solar heat collector on the left end. I had to cut a new hole into the house to make that connection. I thought about this for a long time. How best to do it. My final decision was to cut an opening at the end of the wall between floor joists. The result would be an opening 16 inches by 8 inches, more than was available for the Rev 2.0 crawl space vent design. What I didn't feel comfortable about was removing a section of the base plate at the end of the floor joists. Several years later there are no signs of a problem. I guess it is OK...
[ photo of mid-section down spout support ]
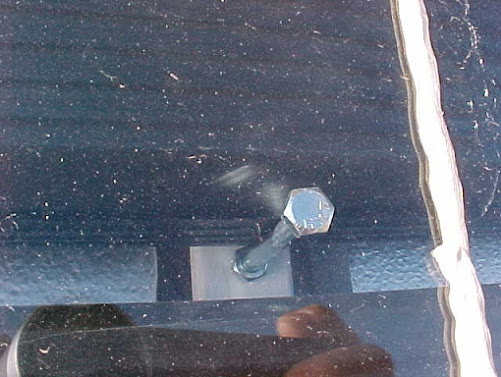
Two 10 foot down spouts joined end to end is a long span. All that weight will make the center joint sag and pull apart. Support is needed in the middle to hold the down spouts level for the whole 20 foot span. In the center of the solar heat collector is a steel frame with holes drilled in it where I attached 3 inch long 1/4 inch bolts. The bolts hold the down spouts level with no special attachment necessary because gravity holds them resting against the steel frame and the bolt.
[ photo of down spout end attachment ]
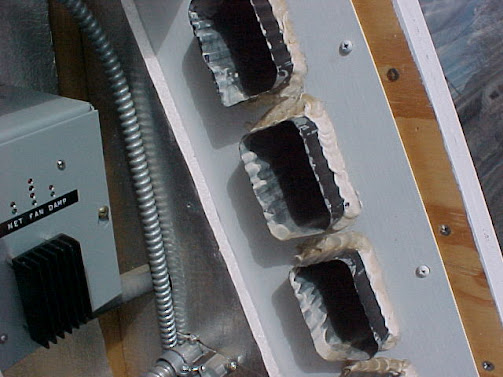
On either end of the solar heater the down spouts are secured with a steel plate. Rectangle holes are cut into the plate which holds the spacing between each down spout. In this photo you can see caulking is used to seal the heat collector box from the heated air flow. The heat collector box is sealed air tight while cold house air is blown into the ends of the down spouts shown here. Heated air emerges from the other end of the down spout's 20 foot span.
[ photo of mid-section down spout support ]
Two 10 foot down spouts joined end to end is a long span. All that weight will make the center joint sag and pull apart. Support is needed in the middle to hold the down spouts level for the whole 20 foot span. In the center of the solar heat collector is a steel frame with holes drilled in it where I attached 3 inch long 1/4 inch bolts. The bolts hold the down spouts level with no special attachment necessary because gravity holds them resting against the steel frame and the bolt.
[ photo of down spout end attachment ]
On either end of the solar heater the down spouts are secured with a steel plate. Rectangle holes are cut into the plate which holds the spacing between each down spout. In this photo you can see caulking is used to seal the heat collector box from the heated air flow. The heat collector box is sealed air tight while cold house air is blown into the ends of the down spouts shown here. Heated air emerges from the other end of the down spout's 20 foot span.
Some things I learned from the Rev 2.0 system

[ photo of access door for furnace air filter ]
- Furnace air filter
Here you can see a little frame on the end of the solar heat collector in the lower left corner. It's an access door into the cold house air inlet. Behind the door is a standard size furnace air filter 14 by 20 inches. Previous designs didn't have an air filter. Inspection of the system at the end of the heating season revealed evidence of dust collecting in the down spouts. Well, the first time I changed the filter after a heating season it was obvious how necessary an air filter is. Yuk! Really necessary.
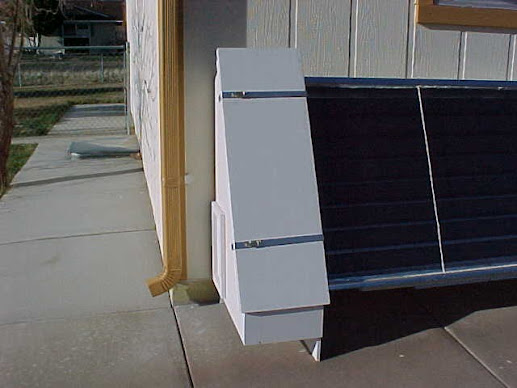
[ photo of cold house air entrance end ]
- Access to internal workings
You can see two aluminum straps with latches across the front of the box. These are easily removed to allow the cover to be lifted off to get inside for servicing. Rev 2.0 showed me how important it is to access the internal workings of the system. Rev 2.0 was held together with lots of wood screws...
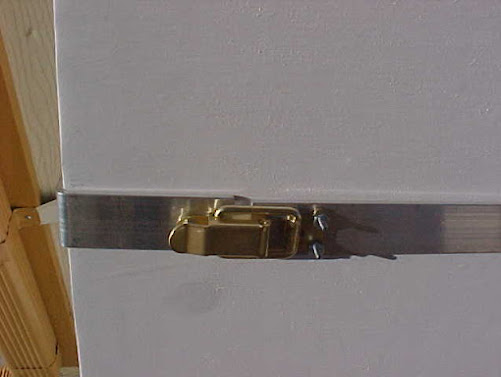
[ photo of aluminum strap with latch ]
[ photo of aluminum strap with latch ]
- Sun and weather destroy things
The removable end covers have a layer of galvanized steel sheet metal tightly fitted. I carefully cut the sheet metal and formed it around the wood. When the fit was just right I soldered all the seams to completely shield it from the weather. Sun, rain and snow destroyed the Rev 2.0 covers in just two seasons! The value of learning from the previous experiment is priceless.
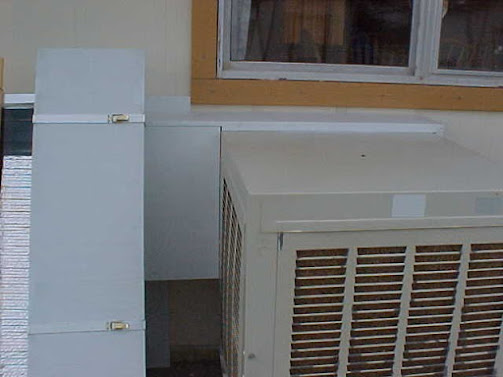
[ photo of finished hot air plenum attached to swamp cooler ]
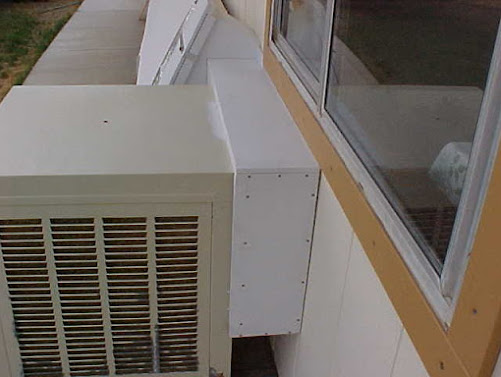
[ photo of housing around swamp cooler plenum ]
After modifying the swamp cooler plenum I built an insulated housing around the whole thing, seen above. Insulation is necessary for the Winter heating season to keep the heated air from being lost. The top of this section is covered with galvanized sheet steel soldered together and formed around the enclosure for a tight fit. Sun and water on this area will destroy wood within a couple years. Yes, that's experience talking... It was originally just painted wood, and it didn't last two years!
[ photo of finished hot air plenum attached to swamp cooler ]
- Switch between Winter heating and Summer cooling
[ photo of housing around swamp cooler plenum ]
After modifying the swamp cooler plenum I built an insulated housing around the whole thing, seen above. Insulation is necessary for the Winter heating season to keep the heated air from being lost. The top of this section is covered with galvanized sheet steel soldered together and formed around the enclosure for a tight fit. Sun and water on this area will destroy wood within a couple years. Yes, that's experience talking... It was originally just painted wood, and it didn't last two years!
How well does it work?
Very well actually! There are still cold, cloudy Winter days when no heat is collected. When the sun does shine, however, it really warms the house. I use the term "warms" here as a "relative" measurement. What's that mean? Well, if the house is 45 F degrees in the morning, a sunny day with freezing temperatures outside will heat the house to around 60 F or 65 F degrees. So 60 F degrees is "warmer" than 45 F degrees, and it feels pretty nice too, when you remember how cold it was when the day started. And yes, if it remains cloudy all day the house remains at 45 F degrees. On those kind of days I'll use the wood heater or kerosene heater to add a little heat.
During Spring and Fall seasons when the outdoor temperature is generally moderate around 35 F degrees to 50 F degrees, the solar heater warms the house to around 70 F or 75 F degrees. Sweet! So, yes, the solar heat collector is working very well for me.
Ongoing improvements
This Rev 3.0 system has been working well for me since I installed it in March 2003. Between then and December 2005 I used the blue squirrel cage blower described in my Rev 2.0 post. During this time I was exploring the possibility of powering the solar heat collector with solar electricity. I found that it is possible and probably a good idea to make it happen. On my electric bill I could see the affect of using the squirrel cage blower, it was a little higher during that time.
In March 2004 I installed solar electric panels in my back yard. I had been working on a design for a solar heat fan controller system during this time. It would measure the temperature of the indoor air and measure the temperature of the solar heat collector air. When the solar heat collector air is warmer than the indoor air it would turn on the fans to move the heated air into the house. This way it should get the most heat into the house and use the least amount of power to do it.
In March 2004 I installed solar electric panels in my back yard. I had been working on a design for a solar heat fan controller system during this time. It would measure the temperature of the indoor air and measure the temperature of the solar heat collector air. When the solar heat collector air is warmer than the indoor air it would turn on the fans to move the heated air into the house. This way it should get the most heat into the house and use the least amount of power to do it.

[ photo of solar heat collector fan controller circuit board ]
[ photo of fan controller front panel ]
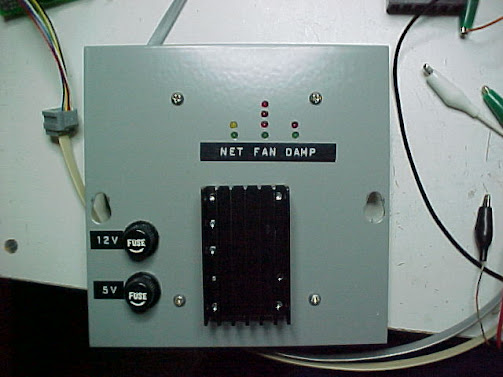
This is the Fan Controller board I designed and built. It uses a Microchip PIC 16F628 processor chip. The job of this circuit is to open and close a duct work damper, turn the fans on and off with three speed settings. The duct work damper closes off the air path through the solar heat collector to prevent cold air from entering the house, back draft. This Fan Controller board communicates with a wall thermostat via RS485 serial network link.
[ photo of wall thermostat Solar Controller ]
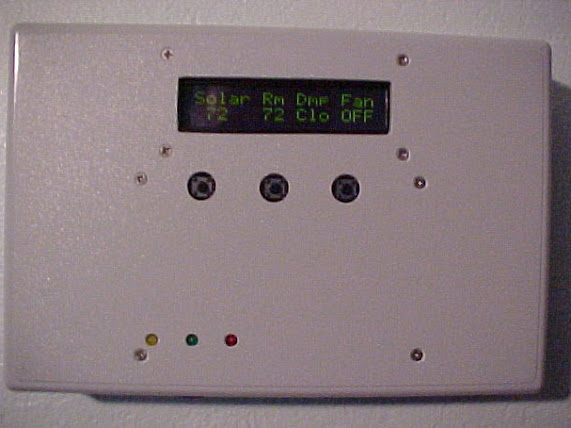
The Solar Controller shown here is also my design using a Microchip 16F876 processor chip. It's job is to make all the decisions: when to turn the fans on and off, set fan speed, measure indoor air temperature, and get solar heat collector air temperature from yet another Microchip controller.
Fan speed is slow when the difference between inside air temperature and the solar heat collector air temperature is about 6 F degrees. Medium speed at 12 F degrees and High speed when the temperature difference is above 18 F degrees. This controller is also connected to another via RS485 serial network which monitors the air temperature inside the solar heat collector.
[ photo of solar heat collector air temperature monitor ]
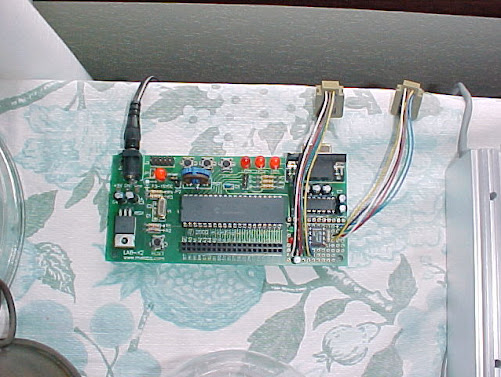
The Solar Temperature Monitor is shown here. Yes, I know, it's just sitting on a cabinet inside the house next to the warm air inlet. And it's just a modified "prototype" board from Micro Engineering Labs. The wires connect it to the RS485 serial network, 12 volt power, and the temperature sensor located inside the solar heat collector. I am planning on building a board specific to this purpose, enclosing it inside a metal box but just haven't got around to doing it. The saying, "If it ain't broke, don't fix it," comes to mind here. I've just been putting it off because "other" things are just more important. And so here it sits, operating perfectly for 8 years now!
[ photo of wall thermostat Solar Controller ]
The Solar Controller shown here is also my design using a Microchip 16F876 processor chip. It's job is to make all the decisions: when to turn the fans on and off, set fan speed, measure indoor air temperature, and get solar heat collector air temperature from yet another Microchip controller.
Fan speed is slow when the difference between inside air temperature and the solar heat collector air temperature is about 6 F degrees. Medium speed at 12 F degrees and High speed when the temperature difference is above 18 F degrees. This controller is also connected to another via RS485 serial network which monitors the air temperature inside the solar heat collector.
[ photo of solar heat collector air temperature monitor ]
The Solar Temperature Monitor is shown here. Yes, I know, it's just sitting on a cabinet inside the house next to the warm air inlet. And it's just a modified "prototype" board from Micro Engineering Labs. The wires connect it to the RS485 serial network, 12 volt power, and the temperature sensor located inside the solar heat collector. I am planning on building a board specific to this purpose, enclosing it inside a metal box but just haven't got around to doing it. The saying, "If it ain't broke, don't fix it," comes to mind here. I've just been putting it off because "other" things are just more important. And so here it sits, operating perfectly for 8 years now!
Let's take a look inside the finished system...
Starting at the cold house air entrance we see there's a lot going on here. First a front view of the box with the cover removed.

[ photo of cold house air entrance ]
The front cover door is leaning against the house at the left. Inside the box on the lower half you can see 2 round black circles: these are the new 12 volt DC fans which replace the 120 VAC squirrel cage blower previously used in this location. Above those is a gray box with several flexible conduit cables attached. This is where the Solar Fan Controller is located.
[ photo of Solar Fan Controller installed and operating ]
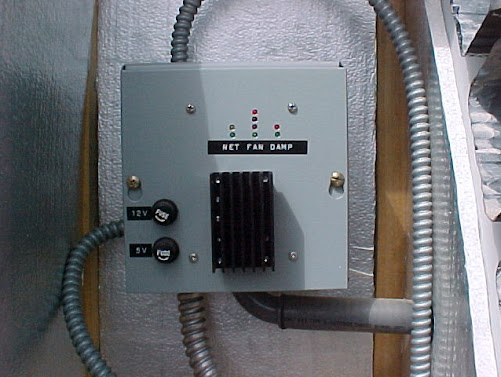
LED indicators on the front panel show the current system status: NET on the left blink when transmit and receive network packets are being exchanged, FAN in the center show OFF (bottom) LOW, MED, HI (top), DAMP on the right shows the damper position OPEN or CLOSED. Fuses on the left are 5 volt for the logic board and 12 volt for the fans and damper.
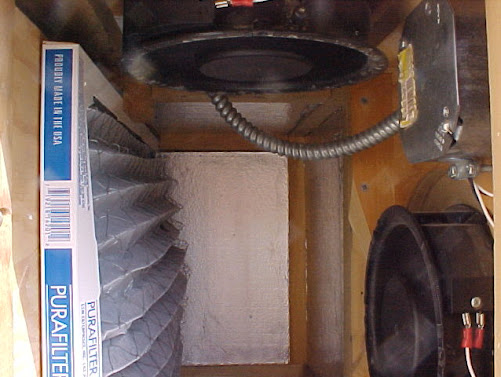
[ photo inside cold house air passage way ]
Inside the access door on the left side of the box is where the furnace air filter is located. Both fans pull cold house air through the duct work behind the filter and force it into the solar heat collector's down spouts.
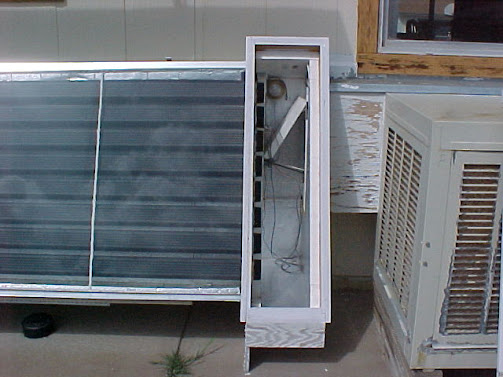
[ photo of heated air output end box ]
Heated air emerges at this end of the down spouts into this collector box. Notice the much thicker insulation on this end. That helps retain as much heat as possible before it enters the house. You can see some other things going on inside here too.
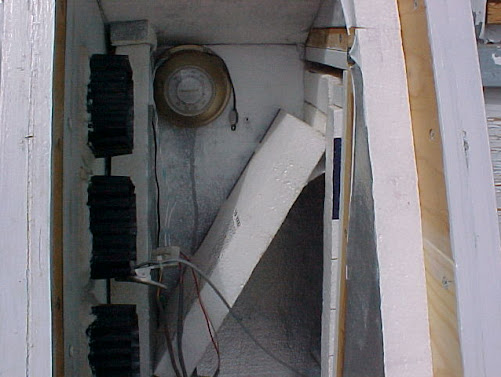
[ photo of baffle and wall thermostat ]
The diagonal piece of foam insulation is a baffle to prevent excessive air flow around the wall thermostat you can see at the top. The wall thermostat is used here as a "fail-safe" device. If the micro controllers should ever fail to run the fans when the sun is heating the down spouts, this thermostat will click-ON forcing the fans ON at full speed. That should prevent a melt-down of the solar heat collector by keeping air circulating.
Again, yes, this is experience speaking from a previous "event" that did some damage. Foam insulation inside the down spout box partially melted from the heat! Ouch! The original software program I wrote for the wall thermostat in the hallway was at fault. It didn't convert temperature above 120 F degrees correctly, and just shut off the fans. Oops... Programming is now fixed, and this fail safe wall thermostat is now a permanent part of the system. The program and the fail-safe device have both been tested. They both passed. Now I feel better about the safe operation of the system. Lesson learned.
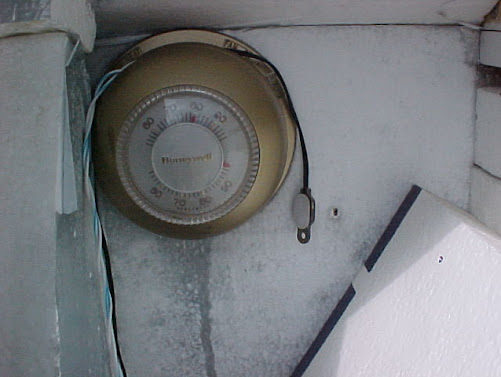
[ photo close up of wall thermostat ]
I am using the "air conditioner" contacts in the wall thermostat to close the fan circuit when the temperature here goes above 80 F degrees. You can see the dial setting red pointer on top. The bottom red pointer is ambient temperature and as you see it is off-the-scale above 100 F degrees. It's a good heating day!
[ photo of solar heat collector temperature sensor clip ]
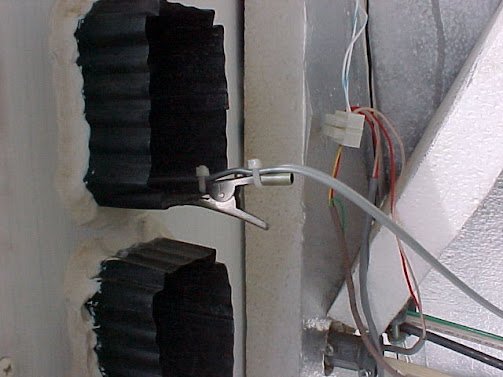
This alligator clip holds the temperature sensor a short distance inside one of the down spouts. When the temperature of this sensor is 6 F degrees above room temperature inside the house, the damper opens and fans turn ON.
[ photo of warm air entrance into the house ]
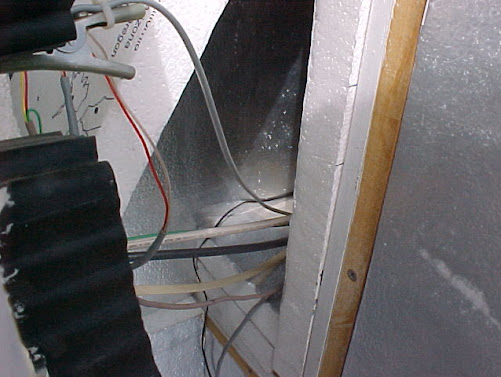
Directly below the diagonal foam baffle is the opening where the warmed air passes into the house. Notice the liberal use of very thick foam insulation around the area. This is to keep as much heat in the air as possible.
[ photo of Solar Fan Controller installed and operating ]
LED indicators on the front panel show the current system status: NET on the left blink when transmit and receive network packets are being exchanged, FAN in the center show OFF (bottom) LOW, MED, HI (top), DAMP on the right shows the damper position OPEN or CLOSED. Fuses on the left are 5 volt for the logic board and 12 volt for the fans and damper.
[ photo inside cold house air passage way ]
Inside the access door on the left side of the box is where the furnace air filter is located. Both fans pull cold house air through the duct work behind the filter and force it into the solar heat collector's down spouts.
[ photo of heated air output end box ]
Heated air emerges at this end of the down spouts into this collector box. Notice the much thicker insulation on this end. That helps retain as much heat as possible before it enters the house. You can see some other things going on inside here too.
[ photo of baffle and wall thermostat ]
The diagonal piece of foam insulation is a baffle to prevent excessive air flow around the wall thermostat you can see at the top. The wall thermostat is used here as a "fail-safe" device. If the micro controllers should ever fail to run the fans when the sun is heating the down spouts, this thermostat will click-ON forcing the fans ON at full speed. That should prevent a melt-down of the solar heat collector by keeping air circulating.
Again, yes, this is experience speaking from a previous "event" that did some damage. Foam insulation inside the down spout box partially melted from the heat! Ouch! The original software program I wrote for the wall thermostat in the hallway was at fault. It didn't convert temperature above 120 F degrees correctly, and just shut off the fans. Oops... Programming is now fixed, and this fail safe wall thermostat is now a permanent part of the system. The program and the fail-safe device have both been tested. They both passed. Now I feel better about the safe operation of the system. Lesson learned.
[ photo close up of wall thermostat ]
I am using the "air conditioner" contacts in the wall thermostat to close the fan circuit when the temperature here goes above 80 F degrees. You can see the dial setting red pointer on top. The bottom red pointer is ambient temperature and as you see it is off-the-scale above 100 F degrees. It's a good heating day!
[ photo of solar heat collector temperature sensor clip ]
This alligator clip holds the temperature sensor a short distance inside one of the down spouts. When the temperature of this sensor is 6 F degrees above room temperature inside the house, the damper opens and fans turn ON.
[ photo of warm air entrance into the house ]
Directly below the diagonal foam baffle is the opening where the warmed air passes into the house. Notice the liberal use of very thick foam insulation around the area. This is to keep as much heat in the air as possible.
Why such expensive fans?

[ photo close up of one of the 12 volt DC fans ]
I did a great deal of searching to find the fans I chose to use here. Two very important factors had to be met for this purpose:
- Low power consumption.
- High enough CFM (Cubic Feet per Minute) air flow.
You must ask yourself this question, "Do I spend the money on high priced fans and build a smaller solar electric system, or do I build a large solar electric system and buy cheap fans?" Let's go through some numbers and see what it looks like.
- $200 for two expensive fans
- ...OR...
- $2000 for a couple more solar panels
- ...PLUS...
- $1800 for batteries to handle the load of the cheap fans, total $2800
It looks pretty clear to me that the expensive fans are a better choice. Things work a little differently when you want to use solar energy at your home instead of grid electricity.
Solar energy requires a new way of thinking...
This is the reality of solar energy with current technology. Solar energy works and is worth the effort however, the most important thing you will learn is conservation. You must use less than what you were while living on the grid. It's so easy to get comfortable connected to a seemingly "limitless supply" of electricity and natural gas. Making your own in your back yard is a limited supply. Your heat and electricity supply are now governed by the weather and your daily use of it. Your neighbors trees shading your solar panels and solar heat collector factor into this as well. You might have to wait for the next sunny day before you can do that load of laundry or vacuum the floors.
Some of these things may not be appealing to you. I've struggled with all of them myself. They'll change your lifestyle, they have changed mine. Daily routines aren't so routine any more. When your home's power and heating is dependent on the weather, you will become acutely aware of what's going on outside. With the few years of experience living like this, it isn't so bad. Freedom from being tied to a utility for electricity or heat is a powerful feeling. I like the independence. I like being in control. Yes, this is worth the effort and lifestyle changes.

Clearly something is different starting in 2002. What you are looking at is hot water heater only from 2002 onward to today. The fiscal year 2013 is currently in progress, that's why it looks smaller that 2012. I think these two "side effects" of the lifestyle change are good ones.
[ photo of original 1/3 hp driven blower ]
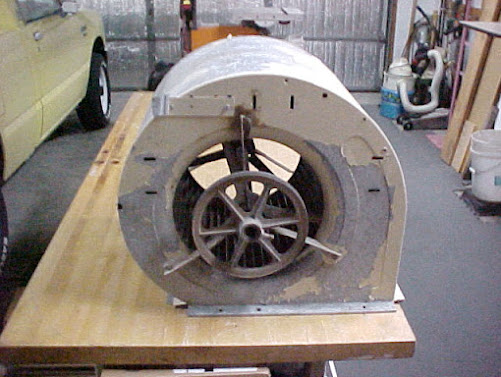
The original squirrel cage blower, shown here removed from the swamp cooler, would move a large volume of air very quickly. With that much air moving it would cool the house down quickly. I would then switch the blower to a slower speed to keep from freezing myself in the middle of Summer. Anyway, it's big and uses a lot of power to run. More power than I wanted to use from the solar electric system powering my house.
[ photo of swamp cooler with blower removed ]
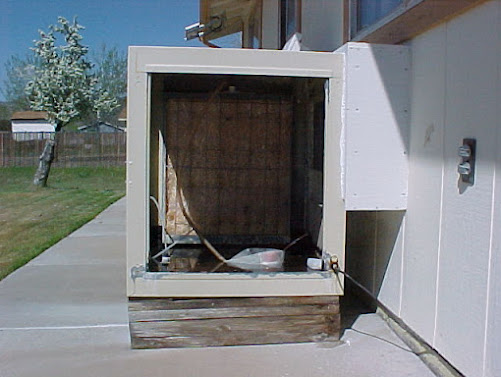
Lots of empty space inside now! The little red and white thing sitting on the bottom is the bilge pump.
[ photo of 12 volt fan array inside swamp cooler ]
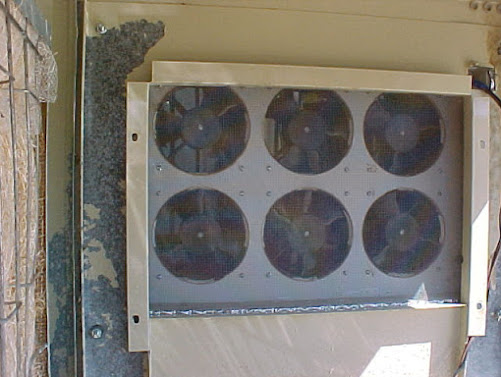
The new 12 volt DC fans, 6 of them installed onto a board for easy removal. Each fan draws about 0.4 amp for a total of about 2.4 amps, 30 watts. These fans don't move the large volume of air that the original squirrel cage blower. Give it a little more time and the cooling effect through the house is the same. Are these fans noisy? No. The sound is a higher pitch whining but not loud at all. These were designed to be quiet. You have to strain to hear them running from the other end of the house. Nice cool breeze and using about about 950 watts less than before. That's cool!
Some of these things may not be appealing to you. I've struggled with all of them myself. They'll change your lifestyle, they have changed mine. Daily routines aren't so routine any more. When your home's power and heating is dependent on the weather, you will become acutely aware of what's going on outside. With the few years of experience living like this, it isn't so bad. Freedom from being tied to a utility for electricity or heat is a powerful feeling. I like the independence. I like being in control. Yes, this is worth the effort and lifestyle changes.
Natural gas use since 2001
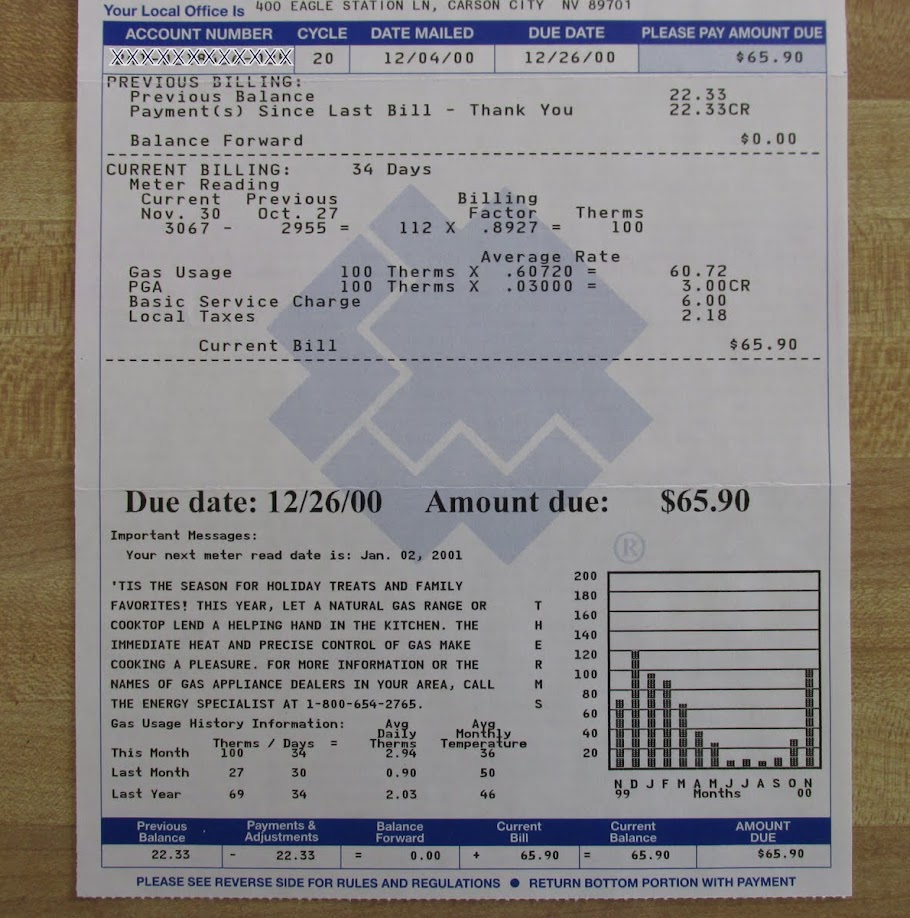
The natural gas bill "event" February 2001 changed my life, for the better I think. My days and nights at home in Winter may be cooler and less comfortable than before the event but those aren't the only side effects. Here are two other side effects:
[ photo of recent natural gas bill ]
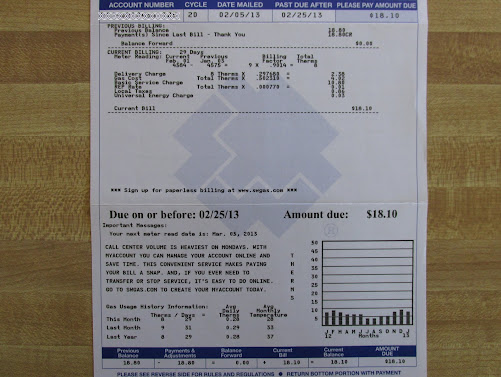
As you can see I'm no longer into "three digits" on my gas bill, saving some money in the process. The little graph on the gas bill kinda looks like the chart below. That's because natural gas only heats the hot water in my house. The dollar amount you see in the photo above is what I have been paying each month, every month since the "event" in 2001. Yes, over ten years now, less than $20 per month! Sweet!
[ chart showing annual usage ]
Clearly something is different starting in 2002. What you are looking at is hot water heater only from 2002 onward to today. The fiscal year 2013 is currently in progress, that's why it looks smaller that 2012. I think these two "side effects" of the lifestyle change are good ones.
Modifications to the swamp cooler
Having a large 1/3 hp AC electric motor pulling about 700 watts takes a toll on my solar electric system. There is also an AC water pump that sits in the bottom tray of the swamp cooler takes an additional 130 watts to operate. 830 watts. Running this on a 12 volt to 120 volt AC power inverter which is only 80% efficient means total power from the batteries is 830 x 1.2 = 996 watts total. Ouch!
To remedy this situation I converted it over to use 12 volt fans and a 12 volt bilge pump. 12 volt fans pull about 30 watts directly from the batteries. 12 volt bilge pump pulls about 24 watts directly from the batteries. The new total is only 54 watts, and they don't use the 12 volt to 120 volt AC power inverter. Now that's a huge improvement and I'm saving some power for other things in my home.
To remedy this situation I converted it over to use 12 volt fans and a 12 volt bilge pump. 12 volt fans pull about 30 watts directly from the batteries. 12 volt bilge pump pulls about 24 watts directly from the batteries. The new total is only 54 watts, and they don't use the 12 volt to 120 volt AC power inverter. Now that's a huge improvement and I'm saving some power for other things in my home.
The original squirrel cage blower, shown here removed from the swamp cooler, would move a large volume of air very quickly. With that much air moving it would cool the house down quickly. I would then switch the blower to a slower speed to keep from freezing myself in the middle of Summer. Anyway, it's big and uses a lot of power to run. More power than I wanted to use from the solar electric system powering my house.
[ photo of swamp cooler with blower removed ]
Lots of empty space inside now! The little red and white thing sitting on the bottom is the bilge pump.
[ photo of 12 volt fan array inside swamp cooler ]
The new 12 volt DC fans, 6 of them installed onto a board for easy removal. Each fan draws about 0.4 amp for a total of about 2.4 amps, 30 watts. These fans don't move the large volume of air that the original squirrel cage blower. Give it a little more time and the cooling effect through the house is the same. Are these fans noisy? No. The sound is a higher pitch whining but not loud at all. These were designed to be quiet. You have to strain to hear them running from the other end of the house. Nice cool breeze and using about about 950 watts less than before. That's cool!
Photo Gallery
Gregg Scholfield 5-3-2013