Improving on solar heating
With only two down spouts inside a marginally engineered enclosure, it is unable to supply any useful amount of heating. It did, however, prove the concept and lay the foundation for improvements.
First step: Make the heat "entrance" into the house...better
There is an opening through the wall of the house where the swamp cooler attaches for summer time cooling. For this experiment I just removed the cooler and set it aside. Cut some foam insulation board to fit the opening, then cut a round hole in it to attach the 8 inch insulated duct hose. Here is what that looks like...

[ photo of hot air entrance into house ]
This arrangement worked OK for the experiment, but I needed something better so both heating and cooling units could be attached at the same time. When the seasons change I wouldn't have to rebuild anything to switch to the other unit. I also needed a way to put a higher volume of warm air into the house. Here is the improved entrance...
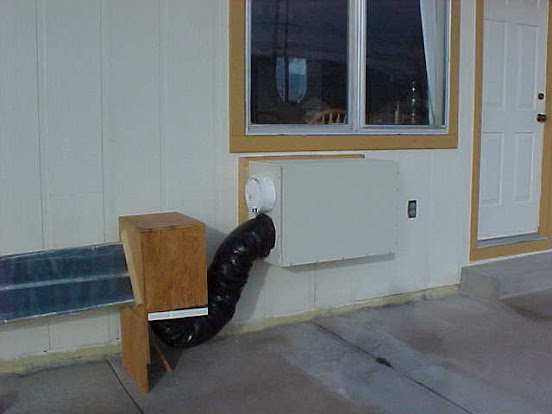
[ photo of improved hot air entrance ]
The new warm air entrance plenum is built using 1/2 inch plywood and securely attached to the house with wood screws. Not a perfect solution to be sure, but the experiment isn't quite over just yet. You can see the provision for a second 8 inch insulated duct hose to be attached above the original. I'm already planning ahead for the next revision which may actually add some useful heat into the house.
I lived with this original system from October to mid-December 2001 to get some experience during the cold time of the year. Now it's time to make improvements to get some real home heating working.
I lived with this original system from October to mid-December 2001 to get some experience during the cold time of the year. Now it's time to make improvements to get some real home heating working.
Next step: Design a better solar heat collector
I did a lot of thinking about how to build a bigger solar heat collector. One that would adequately insulate itself from the cold temperatures while collecting the maximum amount of heat for the house.
New design parameters:
New design parameters:
- A light weight wooden box. Easy for one person to handle by himself.
- Angle the front face to the Winter Solstice Sun declination at solar noon. That's a fancy way of saying on December 20 (solstice) at 12:00 pm standard time (solar noon) the face of the box will point directly at the sun. This is the setting for maximum heat gain during Winter months.
- Foil covered foam insulation glued to the inside. The foil would reflect the suns rays onto the back of the down spouts for added efficiency.
- A single layer of glass to close off the front facing the sun. Dual pane glass would insulate the box better but would also reflect much of the infrared radiation we're trying to capture.
- Down spouts painted flat black. Absorb maximum infrared solar radiation.
- The box housing the down spouts is air tight. We need to keep drafts out to retain as much collected heat as possible for the house.

[ photo of Rev 2.0 solar heat collector ]
There are 8 down spouts inside and two 8 inch insulated flexible duct hoses connecting it to the warm air entrance box. It's not quite finished yet because you can see wood blocks under the ends and the middle holding it up, and there isn't any caulking on the glass panes covering the front yet.

[ photo of Rev 2.0 from angle ]
Looking close at the left end you can see the improvement to the cold house air inlet into the solar heater. I built a wooden plenum to use the full opening on the house for improved air flow and added 1/2 inch foam insulation to the inside. Even though it's cold air from inside the house it's still warmer than outside air and we want to keep it that way.

[ photo of warm air duct hoses ]
Having two 8 inch insulated duct hoses greatly increased the warm air flow into the house.

[ photo of finished solar heat collector ]
The wood blocks supporting each end and the middle are gone now that the ends are attached to the house with wood screws. To prevent rain and snow from entering the box, white caulking can be seen between the panes of glass. Caulk is used around the perimeter of the glass as well. Now it's ready to do some serious work collecting heat for the house.

[ photo showing the angle of the face of the box ]
My house is on the 39th parallel. The sun's angle at the Winter Solstice is lower on the horizon by about 25 degrees according to the astronomy information I found about the suns incident angle. So 39 degrees minus 25 degrees is about 14 degrees. The face of the box is at 16 degrees from vertical or 64 degrees from horizontal to capture the most heat from the sun during the winter months.
These measurements can be confusing when looking at a protractor sitting on the plywood with pencil in hand. Using the earth ground as zero degrees, and point straight up into the sky as 90 degrees it's a little easier for terrestrial beings to grasp. So the slope on the face of the solar heat collector is at 64 degrees.
I measured the sun's position myself over the course of a year just to confirm the numbers. Here's what I got:
Sun is 65 degrees above the Southern horizon in Summer solstice (June 20).
Sun is 15 degrees above the Southern horizon in Winter solstice (December 20).
I measured these with care to find the sun's real position at each solstice. Yes, it took over a year to get these measurements. Actually several years because I re-checked my findings a few times to make sure they are accurate. You don't need to be this accurate to build a solar heat collector, I just needed to satisfy my curiosity by doing these measurements.
In the spring and fall the sun's angle will be higher resulting in less efficient heat capture during those times but that's OK. Outside temperatures will be warmer so we will be needing less heat anyway. And during summer months eaves on the house will partially shade the box from the sun when we don't want heat at all.
[ photo of finished solar heat collector ]
The wood blocks supporting each end and the middle are gone now that the ends are attached to the house with wood screws. To prevent rain and snow from entering the box, white caulking can be seen between the panes of glass. Caulk is used around the perimeter of the glass as well. Now it's ready to do some serious work collecting heat for the house.
Where is the sun?
[ photo showing the angle of the face of the box ]
My house is on the 39th parallel. The sun's angle at the Winter Solstice is lower on the horizon by about 25 degrees according to the astronomy information I found about the suns incident angle. So 39 degrees minus 25 degrees is about 14 degrees. The face of the box is at 16 degrees from vertical or 64 degrees from horizontal to capture the most heat from the sun during the winter months.
These measurements can be confusing when looking at a protractor sitting on the plywood with pencil in hand. Using the earth ground as zero degrees, and point straight up into the sky as 90 degrees it's a little easier for terrestrial beings to grasp. So the slope on the face of the solar heat collector is at 64 degrees.
I measured the sun's position myself over the course of a year just to confirm the numbers. Here's what I got:
Sun is 65 degrees above the Southern horizon in Summer solstice (June 20).
Sun is 15 degrees above the Southern horizon in Winter solstice (December 20).
I measured these with care to find the sun's real position at each solstice. Yes, it took over a year to get these measurements. Actually several years because I re-checked my findings a few times to make sure they are accurate. You don't need to be this accurate to build a solar heat collector, I just needed to satisfy my curiosity by doing these measurements.
In the spring and fall the sun's angle will be higher resulting in less efficient heat capture during those times but that's OK. Outside temperatures will be warmer so we will be needing less heat anyway. And during summer months eaves on the house will partially shade the box from the sun when we don't want heat at all.
We need to move more air through the solar collector
The little duct booster fan won't do with the new larger solar heat collector, so a new blower is needed. I settled on a squirrel cage blower that is housed in an enclosure that can be put in-line, which means it can be inserted into existing duct work under the house.

[ photo of blower at output end ]
This is the end where air exits the blower. The opening is 8 inches diameter to attach to an 8 inch duct.

[ photo of blower intake end ]
Air enters the blower on this end. The black thing in the middle is the motor. You can see a few of the squirrel cage fan blades in the bottom of the opening. This end is also 8 inches diameter for attaching to 8 an inch duct.
This is the end where air exits the blower. The opening is 8 inches diameter to attach to an 8 inch duct.
[ photo of blower intake end ]
Air enters the blower on this end. The black thing in the middle is the motor. You can see a few of the squirrel cage fan blades in the bottom of the opening. This end is also 8 inches diameter for attaching to 8 an inch duct.

[ photo of squirrel cage blower ]
Since the unit can attach directly to 8 inch duct work, this arrangement will work very well. All I have to do is open the connection between two sections of existing duct and insert this between them. I may have to adjust the length of the existing duct work to allow for the added length of the blower.
That's the plan anyway, but for now I just have it sitting on a rolled up bath towel curled around the floor register in the master bedroom. Pointing down so it will pull cold air out of the room and push it down into the floor register. All other registers in the house are shut off or plugged to prevent air from escaping back into the house instead of going into the solar heat collector.
We're moving too much air through the solar heat collector...
This arrangement worked very well. I was getting lots of warm air flow entering the house. But there is a new problem, the blower was moving too much air. It was cooling the solar heat collector to the point where cool air is entering the house. OK, I need a method of controlling the amount of air flow.
It turns out the company that sells this blower also has a speed controller made just for it. Great! So I got one and wired it into the connection. Now the blower motor can be turned way down to just barely moving any air and all the way to full speed. That's what the system needed and it works very well.

[ photo of blower speed controller ]
Black and white wires connect between the AC line and the blower, the extra wires twisted together is a modification I was going to add to the control. I wanted to control the speed of the blower by the temperature of the air inside the solar heat collector. It was never completed because the next big revision to this system eliminated the need for this control. That's part of being an experimenter. Sometimes you move to the next level before completing the previous one.
It turns out the company that sells this blower also has a speed controller made just for it. Great! So I got one and wired it into the connection. Now the blower motor can be turned way down to just barely moving any air and all the way to full speed. That's what the system needed and it works very well.
[ photo of blower speed controller ]
Black and white wires connect between the AC line and the blower, the extra wires twisted together is a modification I was going to add to the control. I wanted to control the speed of the blower by the temperature of the air inside the solar heat collector. It was never completed because the next big revision to this system eliminated the need for this control. That's part of being an experimenter. Sometimes you move to the next level before completing the previous one.
Automated control for daily operation
The solar heat collector is slowly evolving into a real heating system. A system like this needs to turn on and off automatically. It needs to turn on when the sun comes up in the morning, and then turn off as the sun sets in the evening. Keeping things simple I'll just attach a timer to the blower's power connection. That way it will turn on and off at the times I've set on the timer. Great!

[ photo of automatic timer ]
Now the blower turns on in the morning after sunrise, runs all day and shuts off at sunset. The times for these events were determined on a weekend when I was home so I could be sure to get the most heating out of the day, and to keep from circulating cold air when the sun wasn't up. Controlling the blower like this isn't the best way, I know that, but it works. And yes, this is still an on-going experiment. Improvements to the system come one-step-at-a-time, and right now this is a minor one that I can take care of later.
How well is the solar heater warming the house?
It does pretty well. In the Spring and Fall seasons when I get home from work the house is usually 60 F to 65 F degrees. Not bad. On cloudy days there is less sun heating the collector so it doesn't do as well. The house may start out at 55 F in the morning and only get to 58 F when I arrive home in the afternoon.
Winter time heating can be even less when the daytime has clouds blocking the sun. The worst case is when there is no solar heating all day long. That's when the wood heater and kerosene heaters get put to use. I have gotten used to wearing warm clothes at home in the winter. It can get pretty cold inside the house mid-Winter during the week when there isn't a lot of time to heat the place up with the wood heater. I'll admit to waking up one Winter's morning to an indoor temperature of 38 F degrees. Yes, I know that's the "normal" temperature inside a good working refrigerator! This is my incentive to keep working on the problem.
Motivation moves progress forward
Look, I am motivated to find a solution to the high cost of natural gas heating. If I was sitting around a nice toasty warm house contemplating a solution to this problem, I might just click the remote to the next TV station and just sit there and think about it. Not much progress would be made that way. On the other hand, living inside a refrigerator occasionally will keep that motivation alive. Every day that I am cold to the point of being uncomfortable you can know that I am actively working on the next step to attaining my goal. This is what I call incentive. At 38 F degrees that's a lot of incentive.
Summer no-heat arrangement

[ photo of solar heat collector in Summer ]
During the seasons where solar heating isn't needed the solar collector is put into stand-by while the swamp cooler is in use for cooling. In this photo, taken 1-9-2003, the solar heat collector isn't even connected to the house for heating. What's up with that? I am working on the next improvement and haven't got it installed yet.
If you look closely at the picture at the lower left corner of the house you'll see a little white rectangle just above the concrete walkway. That is part of the next step in the design of the solar heat collector. And if you look up at the eve above the solar heater you can see a little black rectangle. That is the first step in solar electricity for me. More on that later.
The next step in solar heating
More heat! Please, more heat! Solar heat collection using rain gutter down spouts appears to be a workable solution from my experience with the systems I've tested so far. But this isn't enough yet. I need a bigger solar collector to get more BTU's into the house. That's where we're going next.
Gregg Scholfield 4-13-2013